
Page 74 - FLIPMAG.NET
P. 74
1.2
CORE SKILLS FINE-TUNE COMPOSITION
Composition not only tells your viewer
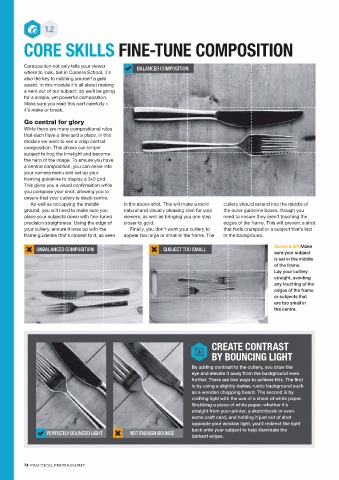
BALANCED COMPOSITION
where to look, but in Camera School, it’s
also the key to nabbing yourself a gold
award. In this module it’s all about making
a hero out of our subject, so we’ll be going
for a simple, yet powerful composition.
Make sure you read this part carefully –
it’s make or break.
Go central for glory
While there are many compositional rules
that each have a time and a place, in this
module we want to see a crisp central
composition. This allows our simple
subject to hog the limelight and become
the hero of the image. To ensure you have
a central composition, you can delve into
your camera menu and set up your
framing guideline to display a 3x3 grid.
This gives you a visual confirmation while
you compose your shot, allowing you to
ensure that your cutlery is dead-centre.
As well as occupying the middle in the above shot. This will make a more cutlery should extend into the middle of
ground, you will need to make sure you natural and visually pleasing shot for your the outer guideline boxes, though you
place your subjects down with fine-tuned viewers, as well as bringing you one step need to ensure they aren’t touching the
precision straightness. Using the edge of closer to gold. edges of the frame. This will prevent a shot
your cutlery, ensure it lines up with the Finally, you don’t want your cutlery to that feels cramped or a subject that’s lost
frame guideline that’s closest to it, as seen appear too large or small in the frame. The in the background.
Above & left Make
UNBALANCED COMPOSITION SUBJECT TOO SMALL
sure your subject
is set in the middle
of the frame.
Lay your cutlery
straight, avoiding
any touching at the
edges of the frame
or subjects that
are too small in
the centre.
CREATE CONTRAST
BY BOUNCING LIGHT
By adding contrast to the cutlery, you draw the
eye and elevate it away from the background even
further. There are two ways to achieve this. The first
is by using a slightly darker, rustic background such
as a wooden chopping board. The second is by
crafting light with the use of a sheet of white paper.
Grabbing a piece of white paper, whether it’s
straight from your printer, a sketchbook or even
some craft card, and holding it just out of shot
opposite your window light, you’ll redirect the light
back onto your subject to help illuminate the
PERFECTLY BOUNCED LIGHT NOT ENOUGH BOUNCE
darkest edges.
74 PRACTICAL PHOTOGRAPHY