
Page 128 - FLIPMAG.NET
P. 128
DIY WORKSHOP
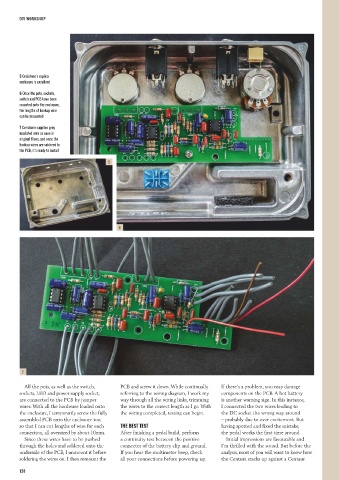
5 Ceriatone’s replica
enclosure is excellent
6 Once the pots, sockets,
switch and PCB have been
mounted onto the enclosure,
the lengths of hookup wire
can be measured
7 Ceriatone supplies grey
insulated wire as seen in
original Klons, and once the
hookup wires are soldered to
the PCB, it’s ready to install
5
6
7
All the pots, as well as the switch, PCB and screw it down. While continually If there’s a problem, you may damage
sockets, LED and power supply socket, referring to the wiring diagram, I work my components on the PCB. A hot battery
are connected to the PCB by jumper way through all the wiring links, trimming is another warning sign. In this instance,
wires. With all the hardware loaded onto the wires to the correct length as I go. With I connected the two wires leading to
the enclosure, I temporarily screw the fully the wiring completed, testing can begin. the DC socket the wrong way around
assembled PCB onto the enclosure too, – probably due to over excitement. But
so that I can cut lengths of wire for each THE BEST TEST having spotted and fixed the mistake,
connection, all oversized by about 10mm. After finishing a pedal build, perform the pedal works the first time around.
Since these wires have to be pushed a continuity test between the positive Initial impressions are favourable and
through the holes and soldered onto the connector of the battery clip and ground. I’m thrilled with the sound. But before the
underside of the PCB, I unmount it before If you hear the multimeter beep, check analysis, most of you will want to know how
soldering the wires on. I then remount the all your connections before powering up. the Centura stacks up against a Centaur.
128