
Page 86 - FLIPMAG.NET
P. 86
THEEDIT
ways to improve long
3exposure shots
WHAT
Long exposures can be tricky to perfect, but YOU NEED
there are plenty of ways that Photoshop can n Photoshop
n Some long exposure
help. Kingsley Singleton shows you how... shots that need a lift
in the editing
process
Improve exposure, BEFORE
1fix colours and
clean up distractions
A S MUCH AS YOU’LL AIM FOR LONG
exposures to be perfect straight out of
the camera, they rarely are. For instance,
calculating exposure time is straightforward, but
can be complicated if the light changes during a
shot. Colour can need work too, especially when
you’re working with very strong neutral density
filters, as many photographers do to extend the
exposure time. These strong filters will often add
a cast, making colours look too warm or cool.
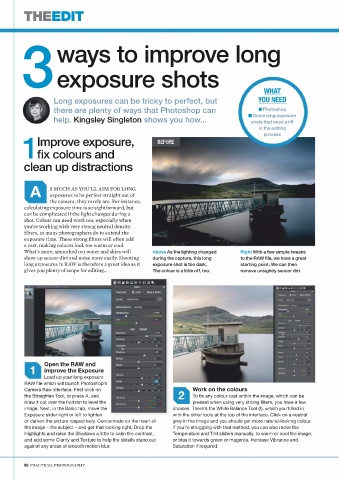
What’s more, smoothed out water and skies will Above As the lighting changed Right With a few simple tweaks
show up sensor dirt and noise more easily. Shooting during the capture, this long to the RAW file, we have a great
long exposures in RAW is therefore a great idea as it exposure shot is too dark. starting point. We can then
gives you plenty of scope for editing... The colour is a little off, too. remove unsightly sensor dirt.
Open the RAW and
1 improve the Exposure
Load up your long exposure
RAW file which will launch Photoshop’s
Camera Raw interface. First click on Work on the colours
2
the Straighten Tool, or press A, and To fix any colour cast within the image, which can be
draw it out over the horizon to level the present when using very strong filters, you have a few
image. Next, in the Basic tab, move the choices. There’s the White Balance Tool (I), which you’ll find in
Exposure slider right or left to lighten with the other tools at the top of the interface. Click on a neutral
or darken the picture respectively. Concentrate on the heart of grey in the image and you should get more natural-looking colour.
the image – the subject – and get that looking right. Drop the If you’re struggling with that method, you can also move the
Highlights and raise the Shadows a little to calm the contrast, Temperature and Tint sliders manually, to warm or cool the image,
and add some Clarity and Texture to help the details stand out or bias it towards green or magenta. Increase Vibrance and
against any areas of smooth motion blur. Saturation if required.
86 PRACTICAL PHOTOGRAPHY