
Page 88 - FLIPMAG.NET
P. 88
THEEDIT
Combine exposures
2 for more motion blur
Y OU CAN’T All you need to do is load up
always get the
several identically framed
shutter speed you shots, and then align and
want. That could be because merge them in a way that
there’s too much light in the shows through a little of each.
scene, you don’t have a strong The combination will extend
filter, or you want to use a the movement of the clouds
specific aperture. Luckily, it’s and the water, to make it look
possible to extend exposure like a much longer exposure
time in Photoshop. Sort of. has taken place.
SHOT 1
SHOT 3
SHOT 2
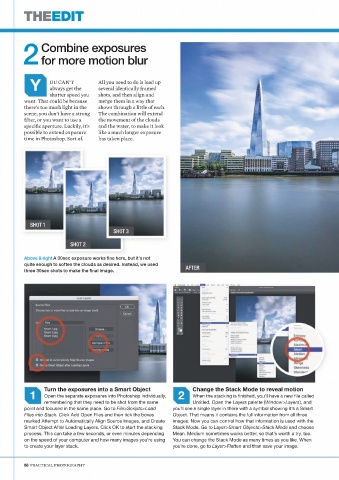
Above & right A 30sec exposure works fine here, but it’s not
quite enough to soften the clouds as desired. Instead, we used
AFTER
three 30sec shots to make the final image.
Turn the exposures into a Smart Object Change the Stack Mode to reveal motion
1 Open the separate exposures into Photoshop individually, 2 When the stacking is finished, you’ll have a new file called
remembering that they need to be shot from the same Untitled. Open the Layers palette (Window>Layers), and
point and focused in the same place. Go to File>Scripts>Load you’ll see a single layer in there with a symbol showing it’s a Smart
Files into Stack. Click Add Open Files and then tick the boxes Object. That means it contains the full information from all three
marked Attempt to Automatically Align Source Images, and Create images. Now you can control how that information is used with the
Smart Object After Loading Layers. Click OK to start the stacking Stack Mode. Go to Layer>Smart Objects>Stack Mode and choose
process. This can take a few seconds, or even minutes depending Mean. Medium sometimes works better, so that’s worth a try, too.
on the speed of your computer and how many images you’re using You can change the Stack Mode as many times as you like. When
to create your layer stack. you’re done, go to Layer>Flatten and than save your image.
88 PRACTICAL PHOTOGRAPHY