
Page 92 - FLIPMAG.NET
P. 92
THEEDIT
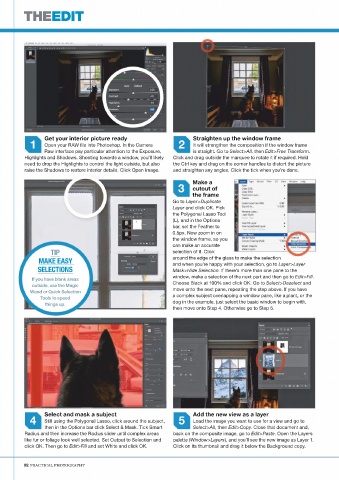
Get your interior picture ready Straighten up the window frame
1 Open your RAW file into Photoshop. In the Camera 2 It will strengthen the composition if the window frame
Raw interface pay particular attention to the Exposure, is straight. Go to Select>All, then Edit>Free Transform.
Highlights and Shadows. Shooting towards a window, you’ll likely Click and drag outside the marquee to rotate it if required. Hold
need to drop the Highlights to control the light outside, but also the Ctrl key and drag on the corner handles to distort the picture
raise the Shadows to restore interior details. Click Open Image. and straighten any angles. Click the tick when you’re done.
Make a
3 cutout of
the frame
Go to Layer>Duplicate
Layer and click OK. Pick
the Polygonal Lasso Tool
(L), and in the Options
bar, set the Feather to
0.5px. Now zoom in on
the window frame, so you
can make an accurate
TIP selection of it. Click
MAKE EASY around the edge of the glass to make the selection
and when you’re happy with your selection, go to Layer>Layer
SELECTIONS Mask>Hide Selection. If there’s more than one pane to the
window, make a selection of the next part and then go to Edit>Fill.
If you have blank areas
Choose Black at 100% and click OK. Go to Select>Deselect and
outside, use the Magic
move onto the next pane, repeating the step above. If you have
Wand or Quick Selection
a complex subject overlapping a window pane, like a plant, or the
Tools to speed
dog in the example, just select the basic window to begin with,
things up.
then move onto Step 4. Otherwise go to Step 5.
Select and mask a subject Add the new view as a layer
4 Still using the Polygonal Lasso, click around the subject, 5 Load the image you want to use for a view and go to
then in the Options bar click Select & Mask. Tick Smart Select>All, then Edit>Copy. Close that document and,
Radius and then increase the Radius slider until complex areas back on the composite image, go to Edit>Paste. Open the Layers
like fur or foliage look well selected. Set Output to Selection and palette (Window>Layers), and you’ll see the new image as Layer 1.
click OK. Then go to Edit>Fill and set White and click OK. Click on its thumbnail and drag it below the Background copy.
92 PRACTICAL PHOTOGRAPHY